
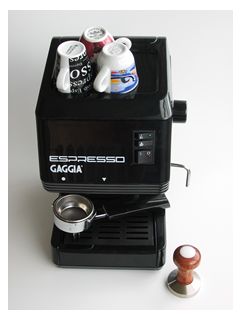
A look inside the heart of a domestic Gaggia espresso machine.
Under the Hood
 You wake up early, trudge to the kitchen and flick on the boiler. By the time you are out of the shower, your girl is piping hot and ready to serve (an espresso!). You pause just long enough to prepare and savour your morning indulgence, wondering if perhaps today you have enough time for a second. All the while, you remain blissfully ignorant of that hidden fear.
That fear that comes from time to time, when you wonder what you'll do if something goes wrong. The inevitable day when your precious cries cold water, won't steam, or fails to light up at all. You are dutiful in the usual preventative maintenance: cleaning, flushing, decalcifying, but what about when your darling needs a simple repair?
[See another short article for a refresher on disassembling the group head for cleaning or gasket replacement.]
What about Light Repairs?
Ok, so it happened to me. Gaggia pumped out my daily espresso, like the little trooper that she is. Her last call of duty was to prepare a latte, after which she had been prudently turned off -- a little habit of mine to prevent the possibility of a dry boiler and overheating.
Imagine my chagrin when she poured warm water after fifteen minutes. Chagrin, and some surprise - it was working an hour ago! No heat and yet the pump works. I try the steamer just to be sure: still no heat. Ok, so I'm thinking that I have somehow blown my thermal fuse. I'm not quite sure how, but that's what it looks like: a working pump and no heat from either brew or steam settings typically means just that. I pull out a multimeter to confirm. Yes sir, the fuse is dead.
What a second, you say, how did you get inside the machine? I didn't know either, but it's actually very easy. The Gaggia Espresso's top cover will nonchalantly flip up from the back, pivoting over the front. It catches only slightly on the water chute. Within the chute there is a screw that may need to be removed to release the top (mine does not).
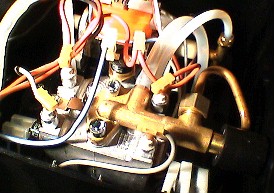 Once inside, the apparatus responsible for the magic of your daily elixir is laid out in plain sight [photo left]. The experience is almost anticlimactic. The orange ulka pump is found at the back of the machine, while several coloured wires attach at various points around the boiler, denoting the external heating elements and the two thermostats. Bundled along the top of the boiler, on the left-hand side, is the fuse.
To the left and right side of the boiler, the smaller grey and orange connectors connect the two heating elements to the circuit. The larger connectors join the two thermostats to the circuit: the brew thermostat is found on the bottom left side of the boiler; the steam thermostat on the top of the boiler.
The grey wires are attached to the thermal fuse before joining with their bundled brethren emerging from the switch-block. If the fuse opens (blows), the heating circuit is disconnected and will not function. You won't get any heat, but the switch indicator lights and pump should still activate. If a particular thermostat goes, it typically only affects that specific function.
-
Hence, the following basic troubleshooting applies:
a) If the machine doesn't power on at all, while you are connected to a powered outlet (which has not tripped a circuit breaker), you likely have a larger problem unless a connector has mysteriously come loose (unlikely);
b) If you get lights, pump action, and no heat on either of the brew or steam settings: most likely you have blown or broken your thermal fuse. Short of determining why this occurred and how to prevent its recurrence, you simply need to obtain and replace this fuse;
c) If you get hot water but no steam: you may have a faulty steam thermostat (the one on top);
d) If you get no heat until the steam switch is flipped on: you may have a faulty brew thermostat (the one near the bottom);
e) If you get both hot water and steam, but your espresso is (i) always sour, or (ii) always bitter/burnt and you swear that everything else is just fine: perhaps your brew thermostat is off temperature and may need to be replaced anyway; similarly, if you get no poop at all in your steaming performance, maybe the steam thermostat could be at fault;
f) If your pump doesn't work or doesn't soon stop making a horrible noise: turn it off immediately; check your water level and then your pump - do not run a pump without water or a pump that is malfunctioning;
g) Other concerns such as failing to get steam from the steam wand are discussed elsewhere. In fact, much of the above is not specifically addressed here. Please review the available resources online and consider posting a question in the guestbook.
Replacing the Fuse

Other than having left my steamer closed and in the on position a bit too long (a minute or two?) while quickly cleaning up a small mess from a milk explosion, or having gently picked up and repositioning my Gaggia while heated, I'm not sure what caused my thermal fuse to fail. I recall feeling above the boiler following the extended steam interval and it really wasn't abnormally hot.
Before performing any work on your Gaggia, please be certain to let it cool off first and that it is unplugged. There is no reason to risk burns or shock in your impatience for that morning joe.
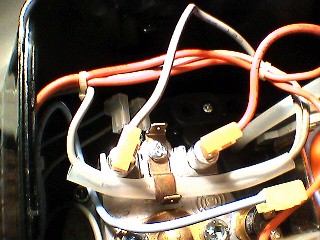
The fuse is covered in a clear sleeve of plastic insulation and held to the boiler surface via a small clamp [here shown to the left]. Loosen the clamp screw (again, Phillips) to release the fuse casing. The fuse itself is crimped to the lead wires, rather than soldered, and looks like a small firecracker connected inline with the grey wires. It resembles a small cylinder with a pointed epoxy cone at one end. That cone points toward the wires headed for the heating elements.
Reading the identification on the fuse identifies its thermal cut-off to be 184 degrees Centigrade (Celsius). Such fuses typically also have an electrical fuse rating and will also open under an abnormally high current. Replacements should be available from a suitable electronics store, though one was not to be found at either of Radio Shack or Canadian Tire here in Eastern Canada. You should be able to purchase these off the shelf. Get spares, they only cost a couple of bucks.
Those looking to save a measly two bucks might be tempted to simply short circuit the fuse. This will work, of course, and can be used in emergency and under close supervision (I did so to confirm the problem). You should never, however, leave a machine modified this way or run such unattended. The thermal cut-off serves a very important purpose and injury could result from disabling it (injury that would not be covered by your insurance).
-
What you will need:
* A pair or two of pliers (or a crimp tool), some wire cutters
* A common Phillips screwdriver (#2 or #1)
* A replacement fuse with crimps (described below)
- A multimeter and/or some wire/alligator clips to verify the bad fuse
- If you didn't wait for your boiler to cool off, or forgot something, you might want to wear some cotton gloves for their minimal protection
Fuse: Thermal cut-off
Original part: Microtemp SNCANZ G4A00 184C
Rating: 184 degrees Celsius (364 degrees Fahrenheit)
Amp rating: We didn't decipher one from the part number;
My replacement has a 15A rating
Crimps: Be sure that your fuse includes crimps to attach the leads;
You should NOT attempt to solder a thermal fuse -
How to do it:
1. Cool down and unplug the machine. Raise the hood.
2. Locate the fuse and release it from the clamp using a Phillips screwdriver. Note the positions of the various connectors, including their relation to the fuse.
3. Test the fuse with your multimeter probes (set to test ohms/resistance): a reading of OL or infinite/out of range confirms a blown fuse. Alternatively, if you are quite sure that the fuse is the culprit, it should work just fine if you temporarily short circuit the fuse (using wire and/or alligator clips, for testing or an emergency espresso only!).
4. Once you have confirmed that the fuse is dead and have obtained the proper 184'C replacement fuse, pull back the plastic sleeve and disconnect the old fuse. Note the orientation of the fuse and its epoxy cone. The cone should be pointing away from the wire bundle and toward the heating elements..a) You should have obtained new crimps with your replacement fuse, in which case you can cut off the existing fuse along with the old crimps.
b) Alternatively, you might be able to simply remove or open the crimps to save the trouble of having to cut back the grey lead wires to expose more wire for crimping. The leads on the replacement fuse are fairly long, however. I was lucky and was able to open the crimps enough to remove the old fuse and replace the new one, then re-crimp them again.
5. Connect the new fuse by crimping it to the grey lead wires in the same orientation as the old fuse. You may need to trim back the fuse leads or strip back the grey wires to expose enough wire to complete the crimp. The cone of the epoxy side of the fuse should point away from the wire bundle and toward the heating elements. Ensure that the crimp is sound.
a) You should only need to crimp the fuse to the lead wires using pliers.
b) You should NOT attempt to solder this fuse. Doing so without sufficient heat sinks will most likely spoil the fuse from excessive heat. If you really must, for some unknown reason, be sure that you know what you are doing and apply appropriate heat sinks (e.g. needlenose pliers between the fuse and the solder point, very brief and careful soldering).
6. Test the line on either side of the fuse to ensure that the circuit is complete.
7. Pull the plastic sleeve back down over the fuse and fit the fuse and its sleeve back under the small clamp, such that the fuse itself sits in the small curved shelf created for it on the surface of the boiler.
8. Check that everything is connected properly and securely and, when you feel confident that this minor matter has been correctly attended to, replace and fill the water reservoir, plug the unit back in, and turn it on. Be sure to refill the boiler, then test that the boiler heats up properly under both brew and steam settings.
9. Enjoy your espresso and say hello to us in the guestbook!
What about the Thermostats?
 I found that very few electronics or appliance stores had a clue what I was talking about. Further, the specific temperature requirements and connection types/locations will vary between manufacturers and machines. You will likely need to order these parts and are not apt to find them in the local store unless your coffee equipment retailer stocks domestic Gaggia thermostats. They should be available from WholeLatteLove or similar equipment vendors. Morala Trading in Ottawa indicated that they could order the parts for $15 each.
As mentioned, the brew thermostat [above right] is located to the left at the lower end of the boiler (where the water will be). The steam thermostat is located on the top of the boiler (where the steam will be). Each thermostat looks like a ~1.5cm diameter black cylinder with two vertical lugs/connectors off the top. The thermostats are connected to the boiler via a wide, thin brass nut/coupling (alleged to be 17mm). This nut should only be tightened BY HAND. If necessary, give it a small 1/8 turn with a wrench but no more. You may need to use a wrench to loosen it.
The thermostats are connected to the overall circuit via the switches at the front of the machine. Each thermostat has a set temperature at which the switch will trigger off: 107'C for brew water and 145'C for steam. There is a differential that applies to the target temperature, representing a tolerance around this set point for when the switch opens and closes. Of course, the boiler temperature will also continue to rise for a short time after the elements turn off from being on full blast (leading to temperature surfing as practiced for some machines). We'd like to have a tight tolerance on our brew temperature.
Aside: I have not been able to find concrete information about the part suffixes (see part numbers below). I'm not sure if they refer to the tolerance/differential at all or not, though different classes of differentials are available for disk-type thermostats. The 'C' suffix could refer to a differential class or perhaps the mounting type (I don't believe that it means Celsius).
When the machine is turned on, the brew thermostat controls the boiler by remaining closed until the desired temperature is reached. The switch then opens to turn off the heating elements and will remain open (off) until the temperature again drops below this point.
When you select the steam switch, the steam thermostat is connected to the circuit, allowing it to control the heating elements with a higher target temperature.
The connectors can be easily removed from the thermostats by hand, though elsewhere others have suggested using a flat-bladed screwdriver. They are removed by loosening the brass nuts, though I can't say any more about it; I haven't yet had to replace mine nor been able to buy spares. You can give them a basic sanity test by testing to see if they are closed at room temperature as expected (i.e., test the resistance across the thermostat). If they fail to complete a circuit at low temperature they are presumably faulty. For those who wish to test their brew water temperature, Glenn provides some suggestions for accomplishing this in his Gaggia Classic review.I hope that your machine never runs into trouble, but if it does be sure to give it the care and attention that it needs. Let us know how you make out! As always: comments, corrections, and/or criticism are welcome.
Replacement Parts -- The parts for my Gaggia Espresso are as follows:
Brew Thermostat (thermo disk, auto reset)
Original Part: 36TXE31 L107-8C
Temperature Rating: 107 degrees Celsius
(224.6 degrees Fahrenheit)
Steam Thermostat (thermo disk, auto reset)
Original Part: 36TXE31 L145-15C
Temperature Rating: 145 degrees Celsius
(293 degrees Fahrenheit)
Thermal Mastic is likely required to reseat the thermostats properly.
Dave is one of our senior writers on the CoffeeCrew.Com website and he knows Gaggia!
Original photos by Colin and Dave - Canon A60 2Mp Camera - various light sources
